How to get HTTPS with an SSL Certificate on Your WordPress Site
If you are using any of our Premium Payment Gateways then we highly recommend you learn how to get HTTPS with an SSL certificate on your site. Enforce HTTPS on your entire site so your donation data is securely encrypted and you build trust with site visitors.
The importance of using an SSL certificate cannot be understated. But it’s an is not an easy task and involves many elements that most users are not familiar or comfortable with. This article will guide you through learning how to get HTTPS using an SSL certificate for your site so you can get up and running with GiveWP as quickly as possible.
There are 5 basic steps to configure your WordPress website with an SSL certificate and enforcing HTTPS throughout your whole site:
- Purchase and install a SSL certificate
- Update your site URL
- Force HTTPS throughout the site
- Resolve any insecure elements on your pages
- Update Google Webmaster Tools and Google Analytics
Each of these steps is complicated and unique various hosting environments. So again, this is only a guide.
Purchase and Install a SSL Certificate
The very first thing that must happen for all WordPress websites is to purchase and install an SSL certificate. Many hosts began offering very cheap or even free SSL certificates over the past few years thanks to lower costs of management and installation. These free or cheap WordPress SSL solutions provide adequate coverage and security for your WordPress site to process eCommerce transactions. While we can’t issue a blanket recommendation to go with the free/cheap certificates, you should research to find the best fit for your needs.
Regardless of whether it’s paid or free, we highly suggest that you obtain your SSL certificate directly from your host and have them install it for you. While it is certainly possible to learn how to get HTTPS on your site yourself, setting up an SSL certificate is very complex process and differs greatly with every hosting platform. If your host does not provide SSL certificates or the ability to install them for you, we would suggest looking for a new host.
If you want to look into installing an SSL yourself, here are a few resources from popular hosts:
- MediaTemple’s SSL instructions
- GoDaddy’s SSL instructions
- WPEngine’s SSL instructions
- Dreamhost’s SSL instructions
- Bluehost’s SSL instructions
We highly recommend purchasing your SSL certificate from your web host and having them configure it for your website. If they don’t offer those services, it might be time to move on.
NOTE: WordPress 5.7 introduced a helpful feature that detects and migrates HTTP sites to HTTPS with one click.
- If your site is running WordPress 5.7 or above, please read the next section: “Setting and Migrating your site to HTTPS with One Click” and then skip to step 5: “Update Google Webmaster Tools and Google Analytics”.
- If your site is running WordPress 5.6 or below, please skip the next section and continue to step 2: “Update Your Site URL”
Setting and Migrating Your Site to HTTPS with One Click
There is a HTTPS detection and migration feature introduced in WordPress 5.7 that sets the site from HTTP to HTTPS. WordPress will be able to tell if the current site supports HTTPS and if so – will provide a way to set it with with one click of a button.
To use that feature, navigate to Tools > Site Health and check for an issue that posts “the website does not use HTTPS”. Click that to display more info. If your site is detected to allow HTTPS, click “Update your site to use HTTPS”. Not only will this button set your WordPress Address (URL) and Site Address (URL) to use HTTPS, it will change all links within the site that were previously using HTTP and migrate them to HTTPS on the fly. This is also the case for site content like images in your media folder. This is really convenient because in WordPress 5.6 and earlier – those links needed to be tracked down and changed to HTTPS manually or via a plugin.
Please keep in mind this HTTPS detection and migration feature only supports site configurations where both the Site Address and WordPress Address is set to be the same. It will not work if those Addresses are configured to be different URLs.
Click here, to learn more about this WordPress 5.7 feature.
Update your Site URL

Now that your SSL certificate is installed and configured for your site, you’ll notice that nothing has changed at all! That’s because your WordPress site hasn’t yet been configured to load using HTTPS instead of HTTP.
HTTPS is the “protocol” used to send encrypted data over the internet and what is required to make sure your donation transactions are secure.
To get HTTPS at the beginning of your domain, go to “Settings > General” and change both the “WordPress Address” and “Site Address” urls to use “https://” instead of “http://”

After you’ve done that, you’ll be automatically logged out of your site. This is because the site now uses “https” and you are logged in with “http”. These are technically two different domains.
Force HTTPS Throughout your Site
Now that your site is configured to load with HTTPS, you want to make sure that ALL of your traffic is loaded via HTTPS. The issue is that Google has indexed your website everywhere using HTTP. So you want to make sure that when a user finds your site with an HTTP link, that they are automatically redirected to HTTPS instead.

The easiest way to do this is with this plugin: WordPress Force HTTPS.
There are quite a few out there that claim to do this. The reason we suggest this plugin currently is that all you do is activate it and you’re done. Keep in mind, that every hosting environment is different. This plugin may not work exactly as you need in some cases.
If you find that doesn’t work for you, you might want to add the following to your .htaccess file via FTP.
Force HTTPS via HTACCESS
RewriteEngine On
RewriteCond %{SERVER_PORT} !^443$
RewriteRule (.*) https://%{HTTP_HOST}%{REQUEST_URI} [R,L]
Resolve Mixed Content throughout Your Site
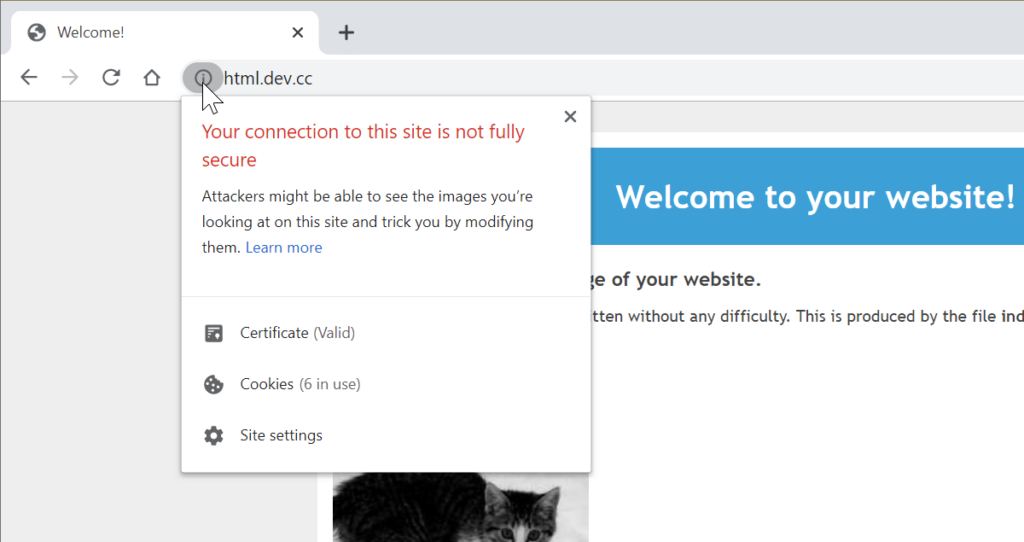
OK. Now that your site has an SSL certificate, you’ve updated your site url, and you are forcing all traffic to go to HTTPS, you might go to a page on your site and you’ll see a YELLOW lock or an alert that says you have insecure elements — or mixed content errors — on your page.
Starting in early 2020, the Chrome web browser will block insecure assets on pages that load over HTTPS. This means that if your image is loaded with HTTP, Chrome will not allow it to show on your page at all. The same goes for your styles (CSS files) or and javascript that you’re running on your page if it is loaded over HTTP instead of HTTPS. This makes the matter of mixed content very important to the success of your online donations.
Mixed content happens because all the time that you were building your site with HTTP, all of your images were loaded into your pages and posts using “HTTP”. The easiest way to resolve this is with a plugin called “Better Search Replace“. Here are the steps:
- Install and Activate Better Search Replace
- Go to “Tool > Better Search Replace”
- In the “Search/Replace” tab, do the following:
- Search for = http://yourdomain.com
- Replace with = https://yourdomain.com
- In the “Select tables” area, select both wp_postmeta and wp_posts. Press “CTRL” or “CMD” to select multiples.
- Unselect “Run as Dry Run”
- Hit “Run Search/Replace”
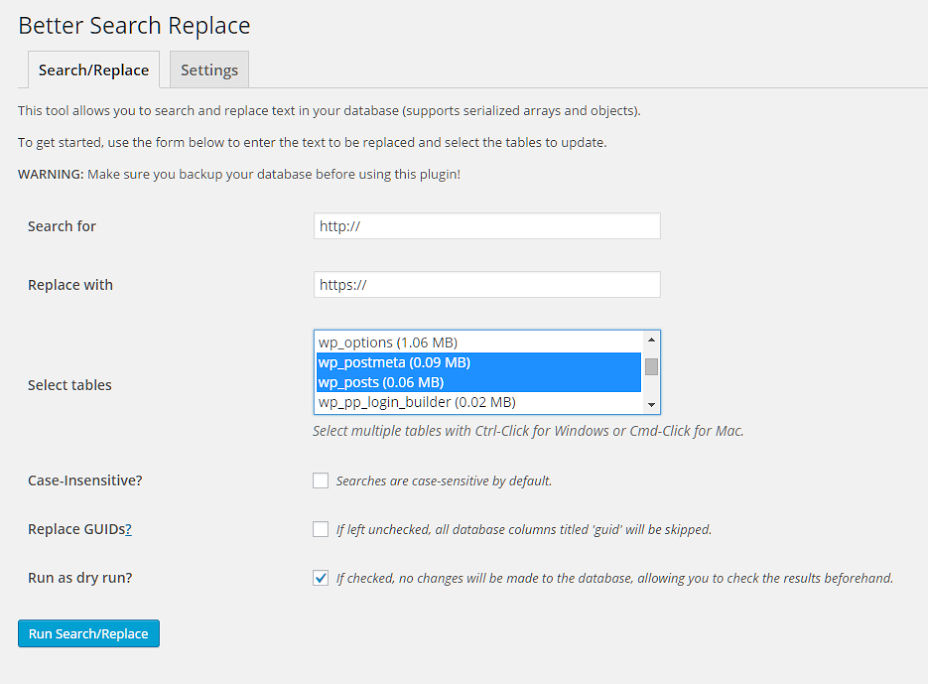
What this does is search through all of your posts and pages and updates all the internal links that are loaded there, and sets their protocol to “HTTPS”. Please note that if your site uses “www” you’ll need to include that as well. Further, if your site once used “www” or vice versa you might want to run multiple searches for your domain with and without “www”. That’s why that “Dry run” setting comes in handy, you can check whether the search is relevant before actually replacing the results.
Once that is done, you’re all done! Congratulations!
Reasons Why You Still Might Not Be Done
So, now you’re bummed because you still have the Yellow lock on some pages. Unfortunately, there’s a really clear reason why this might happen, and it’s not fun.
Basically, you have a theme or a plugin which is loading “assets” like Javascript or CSS files onto your site using an outdated or incorrect method. WordPress has many functions to use to make sure all of these assets are loaded with the appropriate protocol. If this is the case, there are only a few things you can do:
- Put your site url into this tool. That will list all the insecure elements on your page. Look at those urls and you should see whether it’s a plugin or your theme. Contact the theme or plugin author to get them to fix it.
- If you are using a Child Theme, you can most likely override that script. Our own Devin Walker has a great article on that on our WordImpress Blog.
- This might sound harsh, but switch themes or plugins. If your theme or plugin is not loading scripts correctly then there may be other aspects of the theme or plugin that put your site at risk. It may be better for you to move on.
Update Google Search Console
Lastly, now that your site is fully configured with your SSL certificate and all traffic is being forced to “HTTPS”, you’ll want to let Google know about the change. As mentioned previously, Google has been busy indexing all your pages and posts with “HTTP” for a long time. You want it to know that is no longer the best way to reach your site. There are a lot of online resources available for doing that, so this is just an overview:
- Create a new site in Google Search Console (formerly Webmaster Tools) with your updated HTTPS protocol
- Add your Sitemaps to that new account
- Tell Google to Index your new account


